Onboarding Process
To set up LS Insight v. 2020.3 and later you need to follow these steps.
1 Request and receive LS Insight
The first step is to request LS Insight from the LS Retail partner portal. Enter your information and you will receive an email with a download link.
Once you have downloaded and unzipped the LS Insight product package to your machine, you can start the setup of LS Insight.
The package contains a folder with the following files:
- arm_template folder
- arm_template - LS Insight (LS Central 14.2 or older).json
- arm_template - LS Insight (LS Central 15.0 or later).json
- arm_template - LS Insight Hotels.json
- arm_template:parameters.json
- DeploymentScript.ps1
- LS Insight Hotels 2020.3.pbit
- LS Insight Inventory 2020.3.pbit
- LS Insight Sales 2020.3.pbit
- parameters.txt
The folder you extracted the package to, will from now on be referred to as the Base folder.
2 Set up PowerShell and register resource provider
-
To run the onboarding script, you must have the new Azure PowerShell Az module installed.
For further instructions see Introducing the new Azure PowerShell Az module. -
In case you don’t have the Az module installed, run the following command as Administrator in PowerShell:
Install-Module -Name Az -AllowClobber -
You must also register the AZ resource provider by running these lines in PowerShell:
Connect-AzAccount
Register-AzResourceProvider -ProviderName Microsoft.DataFactory
3 Get Azure information
-
In the Azure portal, create a resource group. Save the name of the group for later use:

-
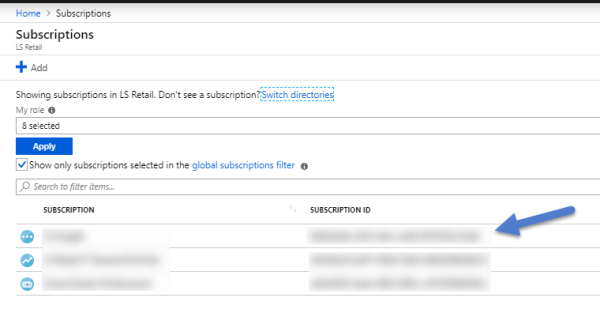
Copy the subscription ID for later use:
4 Create an SQL user
In SQL Management Studio, create an SQL login with read privileges to your LS Central Database.
5 Set the project parameters
Open the file parameters.txt that is included in the package.
Here you enter the following information that is used by the DeploymentScript.ps1 onboarding script. Note: Do not use quotation marks, spaces, or special characters.
$subscriptionId = Enter or paste your Azure subscription ID here.
$SourceServerName = Enter the server name of LS Central.
- This is the server that hosts your LS Central database.
$SourceDatabaseName = Enter the database name for your LS Central.
$SourceUserName = Enter the login of an SQL user that has read privileges for the LS Central database.
$SourcePassword = Enter the password for the above user.
$CompanyName = Enter the company name as it appears in the LS Central 'Company information' table.
$ADFName= LSInsight-ADF
- This will be the name of the Azure Data Factory (ADF) that will be created in Azure by the DeploymentScript.ps1
- You can change this to your preferred name but you need to make sure that this data factory name does not already exist in your Azure portal.
$TriggerStartDate = Enter the start date of the Pipeline trigger schedule on format YYYY-MM-DD
$TriggerOffsetHour = Enter the hour you want the Pipeline run to trigger on format HH
$ResourceGroupName = Enter the resource group you want to use for the project and you created in step 3.1.
$ServerName = LSInsightServer
- The SQL server will be created in Azure by the DeploymentScript.ps1
$DataBaseName = LSInsightDW
- The SQL database will be created in Azure by the DeploymentScript.ps1
$LocationSel = 1
- Select location for the Azure Data Factory service:
- 1 for North Europe (default)
- 2 for East US
- 3 for West US
- 4 for West Central US. More locations will be added when they become available in Azure for all needed services.
$Serverlogin = Enter a name for the admin user of the LSInsightServer.
- The user will be created in Azure by the DeploymentScript.ps1
$Password = Enter a password for the admin user of the LSInsightServer and store the password for later use.
- The password will be created in Azure by the DeploymentScript.ps1
6 Create project and deploy to Azure
-
Open DeploymentScript.ps1 using VS Code, PowerShell ISE, or your favorite PowerShell editor
- Run the script (F5).
-
The script will check for the Az module setup mentioned earlier, and if the module is missing, the script will terminate and you can set it up at this time.
Note: You must open the PowerShell 'as administrator' to be able to set up the module.
- The script will prompt for which version of LS Central you are running:
- Enter 1 and click Enter, for LS Central 14.2 and older.
- Enter 2 and click Enter, for LS Central 15.0 and later.
-
If you are running LS Central 15.0 and later, the script will prompt for which part of LS Insight you want to install. If you are running 14.2 or older, this step is skipped and the script will set up LS Insight for LS Central:
- Enter 1 and click Enter, for LS Insight for LS Central.
- Enter 2 and click Enter, if you already have the LS Insight for LS Central set up and want to add the LS Insight for Hotels.
- Enter 3 and click Enter, if you want to setup LS Insight for LS Central and Hotels.
-
Next, you will be prompted for a full path to the base folder. This is the folder where you extracted the LS Insight package.
If you choose to setup the LS Insight (Hotels) in addition to a previous LS Insight for LS Central installation, you will be also be prompted for a full path to the LS Insight project folder. The project folder is a folder that was generated during the setup of LS Insight (LS Central) with a name like YYYYMMDD-MyProject and it should be present in the Base folder for your previous LS Insight setup.
- The script will now display a summary of the information you have selected and entered. If everything is correct, you can just enter a y and the script will continue, but if you do nothing or enter any other letter, the script will start again from the beginning.
-
Enter your Azure account login information when prompted in a new window.
Note: The Azure login window will pop up in a different window and might be hidden by the PowerShell editor.
-
In the PowerShell enter the password for the LS Insight user when prompted. This is the password you set in the parameter ‘$Password’ in the parameter file. Enter the password and click Enter to continue.
Tip: The running of the script will take awhile, or about 5-10 minutes.
- Once the script is done, it will notify you by printing out a message and a new folder (YYYYMMDD-MyProject) has been added in the Base Folder, including a ReadMe.txt file with your deployment information.
7 Log into Azure portal
-
Open and log into Azure portal.
- You will find 3 resources created with the deployment script:
- Azure Data Factory
- SQL Database
- SQL Server
8 Set up the Azure Gateway
It is now time for you to set up the Gateway:
-
Open the Azure Data Factory that was created.
-
In the main window, open the Author & Monitor link.
-
Open the Author option, the large pencil icon on the left navigation menu.
-
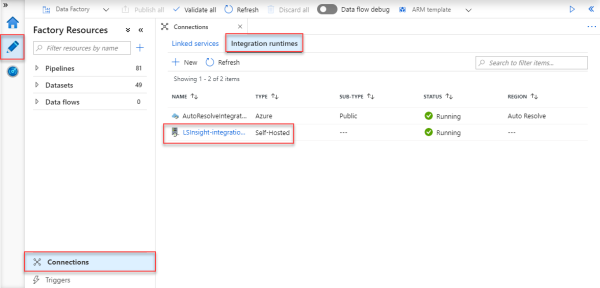
Open Connections at the bottom of the left navigation menu.
-
Open the Integration runtimes tab, on the Connections panel.
-
Open the LSInsight-integrationRuntime from the list.
- From the integration runtime you have two options to set up the Integration runtime (Gateway).
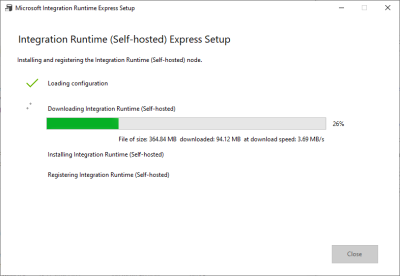
Option 1: Express setup
When you select this option an .exe file starts to download, and once you run it the gateway is set up locally on your machine, without you having to do anything.
Option 2: Manual setup
When you select this option you will download an .exe file to install integration runtime (Gateway) on a different machine. You can then copy the .exe file to any machine and use either key1 or key2 in the setup steps to register the gateway with this Azure data factory.
-
Once you have setup the Gateway, go back to Azure and click Cancel in the Integration runtime panel to close it.
-
Then click Refresh in the Integration runtimes overview window to view the status for LSInsight-integrationRuntime. After you refresh the status should be Running.
9 Activate the pipeline trigger
Now you can finally activate the pipelines that move data from your LS Central database to the Azure data warehouse.
- In the Azure data factory, open Triggers, the bottom of the left navigation menu (just below Connections).
-
Activate the trigger RunAllPipelines by hovering over it in the list and clicking the 'Play' icon.
- Select Publish all from the top menu to commit the changes to the server.
Now the Setup for LS Insight data factory and data warehouse is done and will run as the trigger schedule settings imply.
In case you do not want to wait for the scheduled run, you can now manually run the pipeline trigger, and edit the trigger schedule, if needed.
Tip: If you wait for the schedule, it is a good idea to monitor how the pipeline run went.
10 Set up the Power BI report
The installation package that you extracted to the Base folder includes three Power BI templates that can now be connected to the SQL database created in Azure by the DeploymentScript.ps1.
The Power BI template files are named:
- LS Insight Inventory YYYY.x.pbit
- LS Insight Sales YYYY.x.pbit
- LS Insight Hotels YYYY,x,pbit
Note: The LS Insight Hotels template will only work if you are running the LS Central for Hotels extension (available for version 15.3 and later) in your LS Central instance and have set up LS Insight for LS Central and Hotels.
Connecting Power BI template with LS Insight database
-
Now open either of the LS Insight template files. You need to repeat the following steps for each report template you want to publish to the Power BI cloud service.
Note: You can find the information for the next two steps in the last paragraph of the ReadMe.txt file that was created in Step 6 and was saved with the project setup files.
-
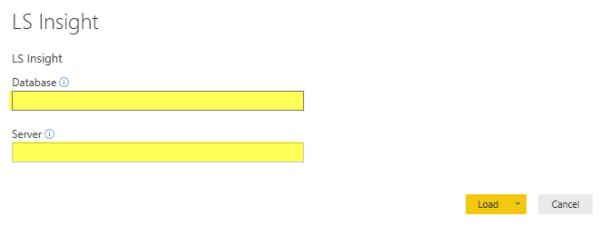
Enter Database and Server information (Server Name and Data Base Name) from ReadMe.txt and click Load:
-
Enter the login information (Serverlogin and Password) from ReadMe.txt and click Connect:
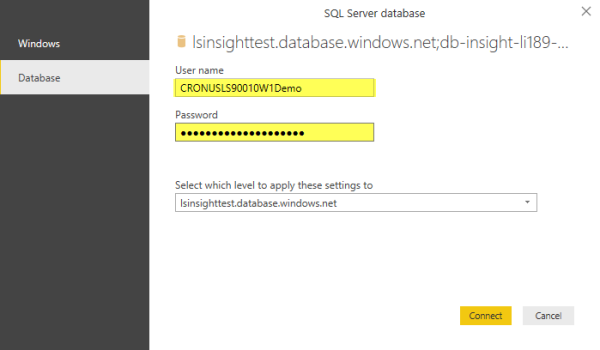
Note: You will not see any data at this stage as firewall rules block direct access to the data in Azure from the local network. Once uploaded to the Power BI service, you will have access to your data. If you still can not see any data after you upload it might be because the pipelines have not run. You can always manually trigger the pipelines if needed.
-
Save your report and name it LS Insight. This will be the name of the dataset and report after you upload the report to the Power BI service.
-
Publish the report to the Power BI service. We recommend that you create a workspace for the report and publish to that workspace (optionally, you can create a test workspace and try out the product and updates there).

11 Set the schedule refresh in Power BI
You can always click the Refresh button to load current data to the dataset. However, as all the data is loaded on each refresh, it can take a few minutes to load. It is therefore recommended to set a refresh schedule on the dataset. This is done in the dataset settings:
-
In your workspace, go to the Datasets menu.
-
For the LS Insight dataset, click the (…) under Actions and select Settings.
-
Expand Scheduled refresh.
-
Enable schedule refresh by turning the Keep your data up to date option to On.
- Set the Refresh frequency and Time.
Note: It is recommended to set the time to a minimum 2 hours after the proposed start time for the Azure Pipeline to allow the data warehouse to fully load before the dataset is refreshed.

Note: In the current version it is not possible to automatically trigger Power BI to refresh after the data warehouse has been updated (this will be available later). Therefore, you will need to have the Power BI refresh time set to refresh at minimum 2 hours after the ADF pipelines start (you can also add additional time to make sure).
-
Now you are all set up and ready to go.
Note: Depending on the data size, the initial load can take a long time. You can monitor the process in Azure but be prepared to wait a few hours before data can be visualized in the Power BI reports.
12 Dataset Items
If you are curious or have questions about the visible items in the LS Insight dataset from the Power BI Templates, it is a good idea to review them.